
Configure a TP-Link Router Using the Tether App
If you’ve got a TP-Link router and want to set it up quickly using your phone rather than a PC, the TP-Link Tether app is one of the easiest ways. Below is a clear, human-friendly guide — based on TP-Link’s own instructions — to help you configure your router in a few simple steps.
This is a simple process and will take about 10 minutes to complete.
What You’ll Need Before You Start
- A compatible TP-Link router (check the compatibility list on TP-Link’s site).
- A smartphone (iOS or Android) with the TP-Link Tether app installed — available in the App Store or Google Play.
- If using wired Internet: an Ethernet cable connecting your Yomura outlet to the router’s Internet/WAN port.
- The router’s default Wi-Fi name (SSID) and password, printed on a sticker on the back or bottom of the router.
Step-by-Step Setup with TP-Link Tether
- Connect to the Router’s Wi-Fi
Go into your phone’s Wi-Fi settings and connect to your router’s default network, using the SSID and password from the router label. - Open the Tether App
Launch the TP-Link Tether app on your smartphone.

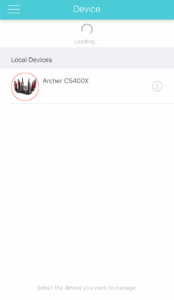
- Select Your Router from Local Device.
In the app, tap the icon representing your router under “Local Devices.” The icon may vary depending on your router model.
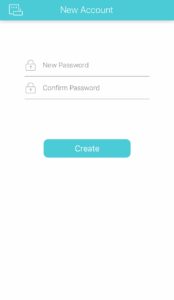
- Log In (or Set a New Password)
You may be prompted to log in or change the router’s admin password. The default login credentials are usually admin/admin.
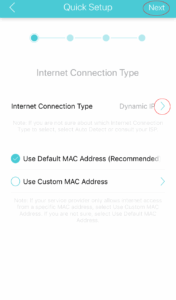
- Quick Setup Begins: Choose Internet Connection Type
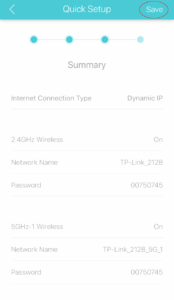
Once logged in, “Quick Setup” should automatically start. Choose the type of Internet connection: Dynamic IP and tap Next.
- Customize Your Wi-Fi Network Name and Passwords
You’ll be asked to rename your Wi-Fi network(s) (SSID) and set new passwords. If your router supports both 2.4 GHz and 5 GHz bands, you may need to configure each separately.Remember these WiFi network names and passwords, without it you won’t be able to connect to your WiFi.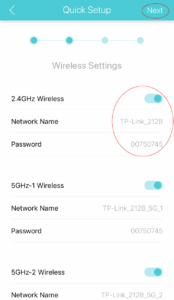
- Review Settings and Save
Once you’ve entered the necessary details, review them carefully. Then tap Save.
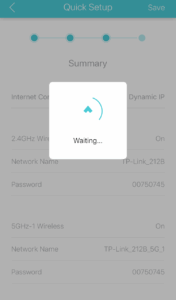
- Wait for Configuration to Complete
The app will apply the settings and configure your router. This may take a minute or two; just wait until it finishes.
- Tap “Finished”
When the setup is complete, hit Finished. Your TP-Link router should now be online, broadcasting Wi-Fi with the settings you chose.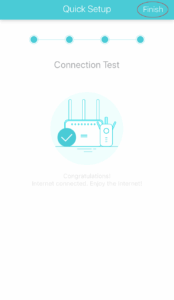
Your router is now configured ready for service. Open a web browser (eg Firefox, Edge, Chrome or Safari) and check one of your favourite sites.